Airtable Collections: Guide
This guide walks you through the steps of building a website using Dynamic Pages connected to an Airtable Collection.
First, a few words about Dynamic Pages
Dynamic Pages enable you to design a page once and use it to create multiple pages, each one displaying different content based on items in a dataset.
Dynamic Pages are great for building sites with multiple pages that have the same design; for example, sites with recipes, team member profiles, project portfolios and more.
In this guide, we’ll walk you through the steps of building a website with Dynamic Pages based on an Airtable Collection.
Why choose an Airtable Collection?
Airtable works like a spreadsheet but gives you the power of a database to organize anything. If you or your customers are already using Airtable to store data, then connecting the data to a Dynamic Page enables you to import and display it according to the layout you’ve set in Duda.
First, let’s look at our data to understand the best way of designing the page. We’ll start by building the collection and then designing the page.
For this example, we’ll build a site with Real Estate listings. Here are the steps we’ll go through:
- Map the collection structure
- Design the layout that will be used for the dynamic pages
- Connect with Airtable and import the collection fields
- Import collection with a specific view (Optional)
- Select the right data type for each field in the collection
- Convert the designed page to a Dynamic Page and connect the collection
- Connect widgets on the page to fields in the collection
- Make the pages accessible to site visitors
- Add the pages to the site navigation
- Enable access via a Photo Gallery or List widget
- Connect your page SEO to the collection data
Map the Collection Structure
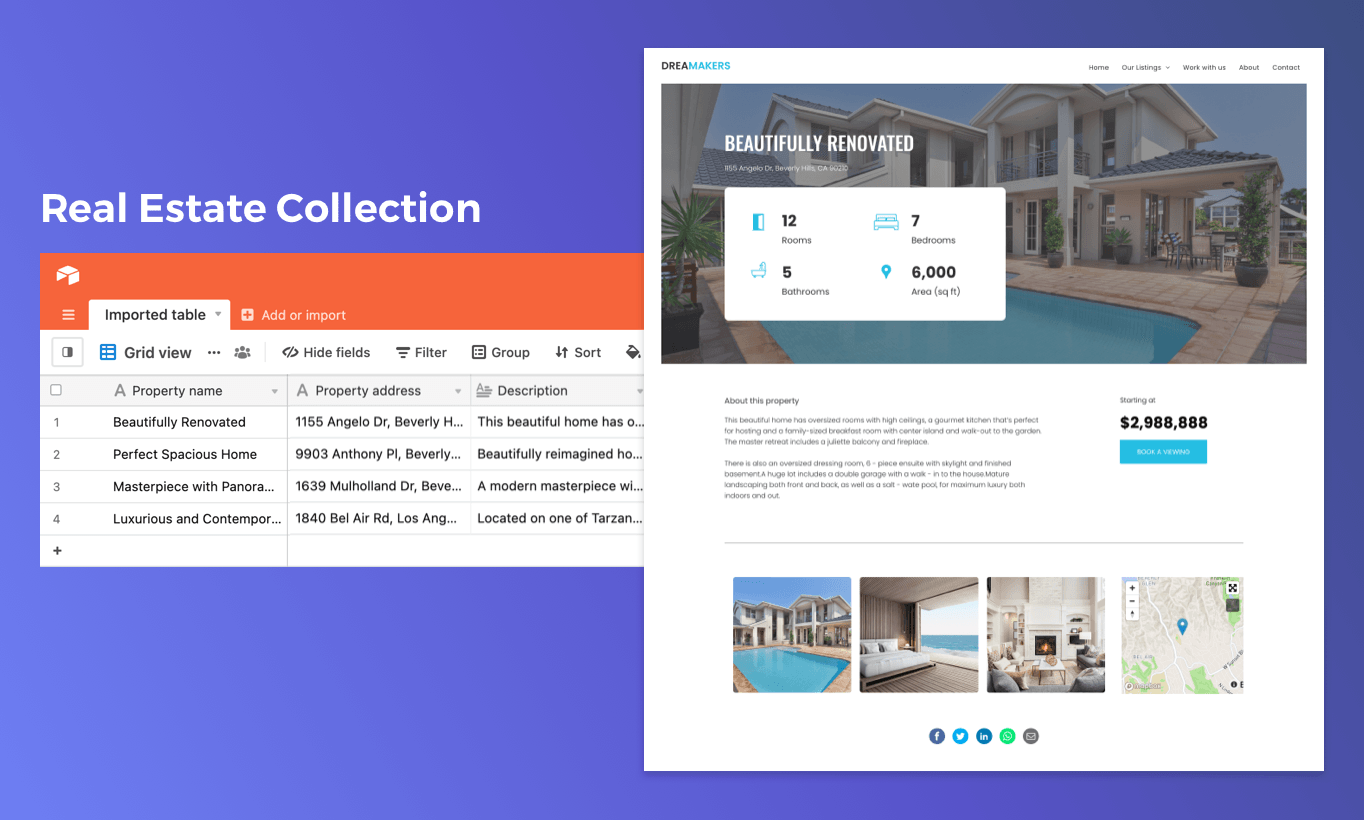
Let’s start by looking at the data you’re going to display. In this example, we’ll create a site with multiple real estate listings generated from a Dynamic Page.
So, let’s map the structure that we'll want want for each listings page:
- Property title
- Property description
- Address
- Price
- Number of rooms
- Number of bedrooms
- Number of bathrooms
- Size/square feet
- Images
- Contact button/details
- Share button
Design the Layout That Will Be Used for Dynamic Page
You can design the page now, to accommodate all of these elements, or design the page after you’ve compiled the content in the Airtable Collection. Both methods work; it really depends on what works best for you.
In this guide, we’ll design the page first. Here’s
how it looks.
Note: We won’t make every element on this page dynamic. For example:
- Property titles and images are dynamic because they change for every listing.
- Titles such as Rooms and Bathrooms aren’t dynamic because they are identical in each listing.
Elements on the page that aren’t dynamic aren’t included in the Airtable Collection.
Connect with Airtable & Import Collection Fields
Now, you'll connect with Airtable and import the collection fields that you want to display.
Note: Duda and Airtable don’t have exactly the same field categories/names, so there are a few things to notice:
- To add a location, use the text field on Airtable. Later, you'll define it as Location on Duda.
- To add a video, use the text field on Airtable. Later, you'll define it as Video on Duda.
- To add an image collection, use the attachment field in Airtable to upload your images. Later, you'll define it as an Inner Collection in Duda, with one image field inside of it.
Here’s how to do it:
Go to Content Library > Collections > New Collection > Airtable. Then follow these instructions (you can see video instructions in the Duda editor, too.):
Step 1: Enter the API key
- Go to your Airtable Account Page and copy the API key.
- Enter it in the API Key field on this screen.
Step 2: Enter the example URL
- Go to your Airtable API Page
- Select your Airtable base
- Select ‘Authentication’ from the sidebar
- Copy the URL that appears under ‘EXAMPLE USING BEARER TOKEN’
- Make sure to copy just the URL without additional characters
- Enter it in the Example URL field in the collection screen
Step 3: Click Import fields.
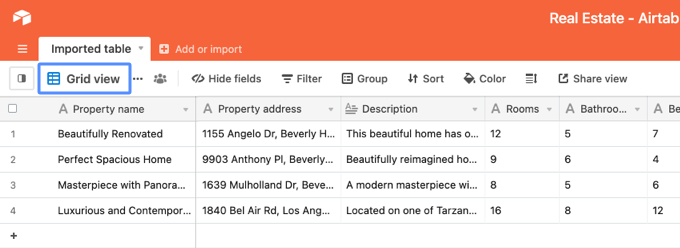
Optional: Import Collection According to a Specific View
In Airtable, you have the option of creating different views for your table. Views allow you to save sorted or filtered data so that when you import the data to Duda, it is saved in exactly that order.
For example, if your collection has information that isn’t relevant for this Dynamic Page, you can create a view that includes only the information that you want, and then import that view to Duda. The other information remains in Airtable; it just isn’t imported. So in this example, if your Airtable Collection contains listings in Alaska and California, and you want to create dynamic pages that show only the California listings, you can filter the Airtable view for California and import it to Duda.
To import a view, complete Step 2 (above), and then add the view name at the end of the Example URL.
For example, if the view is called
California_Listings, add the string “?view=California_Listings” immediately after the URL.
So this:
https://api.airtable.com/v0/appbiL1pCyvFcW8WG/Business%20Data
Becomes this:
https://api.airtable.com/v0/appbiL1pCyvFcW8WG/Business%20Data?view=California_Listings
Important: View name is case sensitive in Airtable.
Select the right data type for each field in the collection / Define the fields in Duda
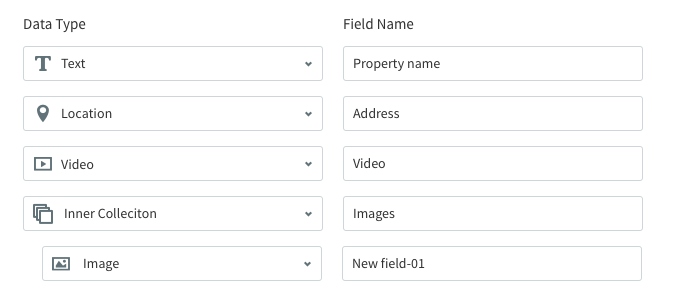
By default, all imported fields are set with the Text data type. You’ll need to change this selection according to the actual content of the field.
In this example, many of the fields actually are text fields, so there is no need to change the data type, but you will need to change them for some fields, in order to connect them to widgets other than text widgets. So, back to our example:
- Change the data type of the Property Address field to Location.
- Change the data type of the List image field to Inner Collection. This data type automatically contains one image, and appears under the Inner Collection data type.
- Change the data type of the Main Image field to Image.
Convert to Dynamic Page & Connect Collection
Once the Airtable Collection is ready, you can connect it to the page we designed earlier.
Here’s how:
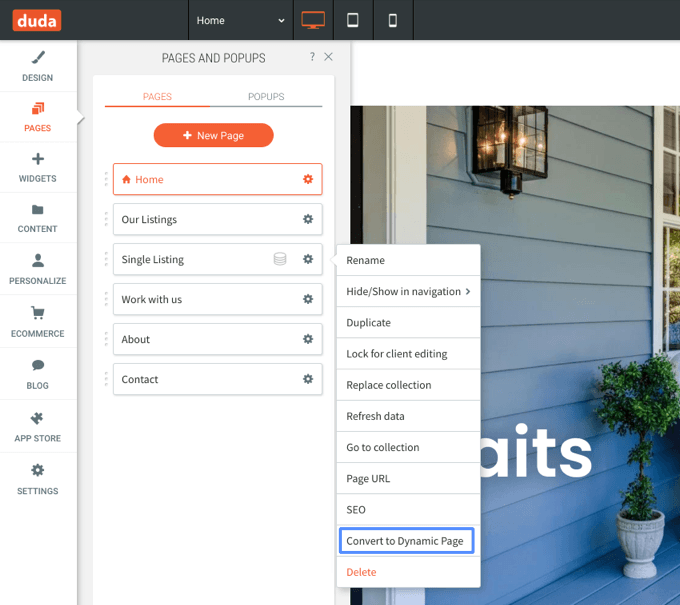
- Open the Pages panel and click the cog icon beside the relevant page.
- Select Convert to Dynamic Page.
- In the popup that opens, select the Airtable collection we’ve just set up, and click done.
Connect Widgets on the Page to Fields in the Collection
Once the page is connected to the collection, you’ll enter Dynamic Mode. While in this mode, connect the page widgets to data in the collection.
To do this, right-click the widget and click Connect to data.
In the popup that appears, you'll see fields in the collection that could match the widget. For example, if you’ve right-clicked on a text widget, you'll see fields with text data types.
Note: Fields that contain addresses, for example, can be connected to either text widgets or map widgets, as long as they are defined as Location in Duda.
View Generated Pages
Want to take a look at the pages you've generated with your Airtable Collection?
Open the Dynamic Page and click the dropdown on the left side of the top toolbar. From here, you can navigate to the various page items generated from the collection to make sure each one looks just right.
Make the Pages Accessible to Site Visitors
Now that you’ve got tens (if not hundreds) of real estate listings on your site, you need to enable site visitors to access them. There are two ways of doing this:
- Add the pages to the site navigation
- Enable access via a Photo Gallery or List widget
Both of these methods can co-exist in perfect harmony on a single site.
NOTE: Adding dynamic pages to the site navigation is recommended for sites that have no more than 20 dynamic pages, since having too many entries in the navigation dropdown can be distracting. Technically, you can have up to 150 pages.
Add the Pages to the Site Navigation
First, make sure there is a page or folder in the site navigation that will be the parent link for the dynamic pages you want to display.
In the Pages panel, click the settings icon beside the dynamic page you want to display in the navigation.
In the context menu that appears, click Hide/Show on navigation > Show on all.
In the popup that appears, select the parent link for these pages and then choose the field you want to display.
To change any of this information at any time, click Hide/Show on navigation > Set nav info.
Enable access via a Photo Gallery or List Widget
This method is ideal when displaying more than 20 dynamic pages, as site visitors can simply scroll through the images.
Also, this method enables you to use images so people can see what they are clicking to. With listings, for example, a Photo Gallery is a great way for people to see more details about the page item they want to go to. They can see the image, title and price in the gallery, as opposed to just a descriptive word or two in the navigation.
To do this, add a Photo Gallery or List widget to any page on your site. For this example, we suggest adding one to a site page called Listings.
Go to the Listings page and add a Photo Gallery widget.
Right-click on the widget, click Connect to Data, and connect it to the Airtable Collection.
Connect the widget's image, title, description and link to relevant fields in the collection. Make sure the Link field is connected to the Dynamic Page - in this case, the page named Single Listing. If there is only one field that matches a specific content type in the collection, it may be auto-selected.
Connect your page SEO to the collection data
Now that your Dynamic Page is connected, you can connect the page to SEO properties. In the Pages panel, click the cog icon of the Dynamic Page and select SEO. From here, you can connect the SEO title and description, as well as the social network image, to fields in your collection. This gives you different SEO properties for each of your page items; in this case, for each listing.
Voila! That’s all there is to it
That’s how you can create a great-looking site with Dynamic Pages based on an Airtable Collection.
Want to add a new listing? Just add a new row in the collection and fill the fields with content.
Want to add a new element to each home listing? First, go to Airtable, add a new column and fill it with content for each listing. Next, go to the Content Library > Collections, select the collection and manually add the new field. Click Refresh data to fetch the new data.
Want your client to manage their own content? Make sure they have access to the Airtable collection.
Airtable Collections are one of four ways that you can store data for building Dynamic Pages. For instructions on how to build collections right inside Duda, see the Internal Collections: How To.
LATEST POSTS