Connected Data: Let it all Sync in
Increase the accuracy and consistency of your sites with Connected Data , a powerful new capability that enables your site to automatically sync data (like business info, text and images) to the Content Library and to the site's widgets. This data can be added manually or via external sources. Connected Data makes it easy to build and edit sites quickly, and refresh a site's design while keeping its content.
How does it work?
Connected Data syncs widgets on your site with data fields in the site’s Content Library. If these fields are connected to outside sources of information, they’ll be automatically updated when the external source is updated (you can even update just them and not the whole site...) or you can update them manually in the content library.
They serve as a single, consistent source of truth and information for the site.
First things first - Filling your Content Library with content
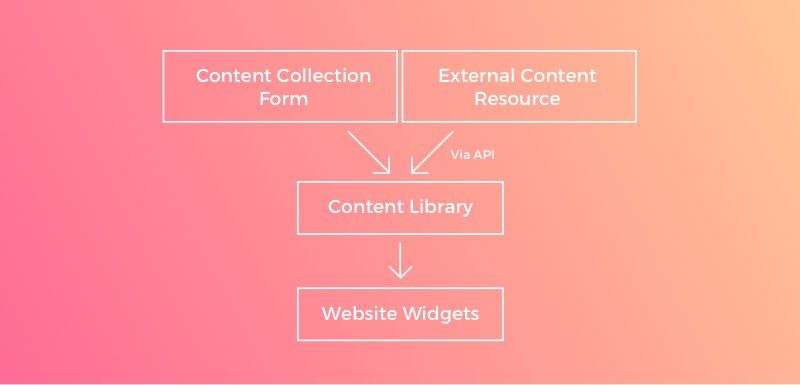
It all starts with your Content Library, designed for easy data management, all in one place. This is where content (business info, text, images) must be stored in order to enable Connected Data. You can fill the Content Library manually, using the content collection form, or via the Content Library API.
Data used in Connected Data is stored in these areas:
- Business Info:
Phone Number, Email Address, Social links and Business Address
- Business Text: Full paragraphs that you can add to the site
- Business Images: Logo and single images
- Collections:
Galleries of images, each with a title and description, that you can connect to a gallery, slider, etc.
All of this data comes with a default or customizable label. The label is what binds the data in the Content Library to the site widget. You connect the widget by selecting the label of the content that you want.
Next step - Connecting widgets
Once your Content Library has data, you can start connecting widgets.
1. Right-click on a widget to open the context menu.
2.
Click Connect to data
.
*If you can’t see
Connect to data
in the context menu, it means this widget isn’t supported or you don’t have the right data for it in the Content Library. For example, if you don’t have any images in the Content Library, you won’t be able to connect an image widget.
3. In the Connect Data popup , choose the label of the data you want to connect and then click Done.
That’s all there is to it.
You can edit the Connected Data at any time via the Content Library, change the data that the widget is connected to, or remove the connection altogether.

How do I use it? (aka What's it good for?)
Scalable changes - Update once, update everywhere
When you pull content from the Content Library, you ensure that the content appears consistently throughout the site. If you want to update content sitewide, changing it in the Content Library ensures that it’s updated everywhere.
For example: Update logo
Let’s say your client changes their logo. Instead of going into every logo widget on the site and replacing the logo one image at a time, you can simply replace the logo in the Content Library.
1. Make sure the logo image in all devices and across the site is connected to the Logo label.
2. Change the logo in the Content Library.
That’s it. All images connected to the Logo label will be updated automatically, everywhere.
Use external resources to build sites faster
If you're managing your customer’s data in an an external CRM tool (for example, Salesforce, vCita) or using a customize contact form to collect client information, you can just pull this information into a template that you built that is already connected to data (see Customize Template, below). In one click, you’ll pull the required info and are ready to go.
Create a site with 1 click and 3 API calls:
You've got a new lead and want to show them the amazing service you have to offer. Just enter the lead's data in your CRM and you can build an initial website with just 3 API calls:
-
Create site API with template ID that is already connected:
https://www.duda.co/developers/REST-API-Reference/#create-site
-
Update content library API to push all information to the new site content library and therefore the widgets:
https://www.duda.co/developers/REST-API-Reference/#update-content-library-data - Publish site API
(You can also use this to generate a preview link):
https://www.duda.co/developers/REST-API-Reference/#publish-site
Automatic update via external sources
Let’s say the address of your client’s head office changes. If that information is connected via the Content Library to your CRM tool, changing the address there will automatically update it in the website:
-
Update content library API:
https://www.duda.co/developers/REST-API-Reference/#update-content-library-data
-
Publish only the content library:
https://www.duda.co/developers/REST-API-Reference/#publish-content-library-changes
Switch templates while keeping site content
A great benefit of Connected Data is the separation between a site's content and design. When content is stored in the Content Library, you can switch a template while keeping site data and the content will continue with you to the new site. Moreover, if widgets in the new site are connected to the same labels, then the content will automatically display in the new site. It’s almost like magic….
For example: Upgrade design
Want to offer a redesign as an upsell? With Connected Data, you can do this by creating a new website with little effort. Here’s how.
1. Open the Global Design tab and click Reset Site .
2. Choose the Keep Site Data option and then choose a new template.
If the widgets in the new template are connected to the same labels, the content will automatically be added to them.
If not, all content that was saved in the old site's Content Library will be available in the new site as well. Store and Blog content will also be saved.
3. Check that everything is in the right place and you’re ready to go: a new site with a refreshed design .
Note: Content that wasn't saved in the Content Library, like pages and custom paragraph, will be deleted.
How does it save me time?
1. Building sites for customers with info in an external database.
If you’ve built a new client’s profile externally, you’ve already entered lots of customer information in that database. Connect this information via API to a site’s Content Library and voila - your website will automatically be populated with it.
2. Building sites for new customers.
You can build websites quickly by adding a customer’s important business information to the Content Library right from the start. Eliminate the busy work of copying and pasting their email address multiple times on the site; simply connect the email address label when relevant and it will automatically appear.
3. Editing sites.
Change your mind about where to put specific text? No problem. If the text has been saved in the Content Library, you can simply connect it to a new widget in a different part of the site and the data will automatically be pulled into that area. No need to retype the text manually.
Some recommendations
Use the Content Library!
It allows for easy data management, all in one place, improving your site building, editing, and updating processes.
Customize your templates.
To speed up your work process, we suggest that you connect widgets in your custom templates to identical labels. (If you’re using Duda templates, you can save them as your own and add labels.) This customization makes switching templates and updating designs much more efficient.
Copy and save info that isn't in the Content Library.
Content that's been added directly to a site, for example pages and custom paragraphs, will not be saved when you switch templates. So make sure to either add them to the library or save them elsewhere first.
Let the syncing begin!
LATEST POSTS